Showing posts with label 28mm. Show all posts

Tuesday, 24 March 2026

Back to Omaha 2

 As a follow up to the last post, in addition to the trenches - I also got some more M4A1 Sherman's and I then printed out the snorkel exhausts from my own pla printer.


These came from 3D print valley (without the exhaust snorkels).
Sherman DD

Sherman DD

Sherman DD


The tanks come surprisingly in 4 parts see below. 
I was impressed. I bought these to see what they were like (not a freebie) . These are really clean, flat prints with very little or no cleaning up. You really would need to look close to see print lines - if any. My own  pla printer could not get near this  quality. 


Meanwhile the Les Moulins side of the Omaha board has had a coat of base colour. Now the trenches are cut to size.

We still need to match it on the right side to the other board.


We also tried out the bunker (made from foam) by sinking it into the board. We are still to do the roof.
More flock and static grass needed!

Starting to get there... we want more beach/sand in front of the cliff so we are going to sand the orange/sand boards to blend in...and that will be for the other side as well

New half of our board...
Omaha
It will also have a 4ft x 6ft sea mat in front of the beach . 


Monday, 13 October 2025

Higgins Boats 28mm

The six new 28mm Higgins boats arrived and I made up 2 more from scratch to the same size...so that we could blow them up!

Below: our new 3d prints to be painted and decal'd.

            28mm Higgins Boat 

Below: This is one of our original boats (see previous Omaha Beach Game) with a whole new set of figures... I had to use the old warlord figures to get some open handed figures. The gun crew and driver are just green stuff and extra arms and heads.

28mm Higgins

The idea was to show some guys exiting over the side walls...we have lots of wading guys already.

28mm Higgins Boat

Below: Then I got a bit carried away and made up a scratch built Higgins - an exploding one - from mdf bits and placed inside a flickering (battery opreated) candle into the centre...I cut out the base so that the battery could be replaced. The effect worked out ok.


28mm Higgins Boat

Then I started adding guys, helmets, weapons, bangalores etc. 
28mm Higgins Boat
Above: The guys are falling backwards at the front due to the boat due to the shell impact.
Anyone any idea how I can store this ! LOL Its going to be a nightmare.


We can use this as a casualty marker in the game...

Then I did another scratch built half sunken one...to leave on the shoreline. This involved a shallow liquid water pour on the inside. I think I could've went higher with the pour on the inside to cover the guys... but the sea level of the mat outside the boat might've looked a little strange. So I went for a shallow pour.


Below: A guy stands on a box to get out - over the side. It was really just to put another marker on the table and it didn't really cost anything - it was just spares from the bits box and time. 
Bolt action
So I also used green stuff (knedite) to model gun crews and drivers for the new boats.

Next stop is terrain...

Monday, 8 July 2024

U Boat crew 28mm

 So with our next game in mind we needed a group of German guys...no prizes for guessing what our Commandos will be trying to destroy during the new game..

So this "crew" started life as US Marines and German infantry. I removed/sanded the ammo pouches and all webbing... sanded any jackboots and added green stuff for the trouser bottoms and life jackets.  Then gave them new heads.


I printed out some German eagles at a scale/size so that I could attach to the boxes. My intention is to have the crew loading their boat - with a Captain onboard directing traffic. The uniforms are based on actual pictures of crew.

U Boat

The beard came out ok on the Captain...and of course deck crew wearing life jackets.
u boat crew

Some of the shore guys are the warlord metal figures...so again I cut the bases away...and mounted them on clear bases.

 The  blue top is colourful for us! LOL

We can re-use our Stalingrad vehicles (3d prints) for transport... the crates/boxes are removable from the vehicles and will become part of the "load the boat" game!

Hey ...put that Van Gogh back..! Schnell !

Clear bases for the HMGs and some dock items (boxes and barrel) and ammo boxes. 
These German Kriegsmarine figures were donated for the game by Gavin 
(p.s. if you wargame in Glasgow you know Gavin!). Cheers Gavin.


The lorry unloading crew...opening boxes to take into boat hatches.

So lots of German guys moving boxes...
These guys are re based.


So its getting there. We have lots more Germans (if needed) but I think more Commandos might be needed! But we will need to also think about location next...can anyone else hear the film/tv theme tune - Das Boot... here we go!


Sunday, 7 July 2024

28MM COMMANDO WW2 1 OF 3

Its been a while and we have taken this year away from displaying at the big Scottish war game shows  but are planning to return next year.

We are now preparing these guys for action.

I managed to pick up a "half made" set on e bay cheap but I quickly realise that the OLD Warlord Commando set (25 off) was well not quite up to what it should be...(the new sets have 30 off figures) 

So some of the ebay figures were already assembled on the usual bases - they had to be cut off as we prefer clear bases.

I used the tradition English uniform colour but half of the pre made guys had sterling's across their body as opposed to firing poses...? ( I actually think they may not be able to pose in firing positions?) so I chopped them! I used my US marine arms on some of them.

This gave them better poses. I think. But I had to sand their bodies to fit.

28MM COMMANDO WW2


I made a sniper, 3 piat guys, 2 knee mortars and 2 brens. To the mortar guys I added boxes and shells in their hand.  The piat was never going to fit the hand in the sets provided. I don't see how any of the supplied arms would make an aiming figure. This is the old set and notably on the new set they have most of the weapons attached to hands on the sprue. 
I did liked the ropes and Bergan packs. They do look like they are well equipped. Again I used my spares...US Marine or infantry hands with the binoculars.

I added some straps to some  of the rifles with green stuff.

You can see how tricky it is to place these guys in the centre of the clear base....stop sliding around ! LOL (and that's with two paint bottles and blue tac supporting it).

The British uniform colour definitely needs a dry brush - otherwise dark mud and the detail disappears! 

To my surprise these guys came with no patches ....so I might leave them or paint them later.

We are planning a raid style game... I might go for the new Warlord plastic pack (30 off) next.


and of course the Germans...see next post coming soon.


Sunday, 24 April 2022

28mm Tarawa Marine

 No one gets left behind!

I had fancied doing a casualty being carried to safety by another 28mm Marine for the Tarawa board. 

So I did some parts searching in the bit box and came up with enough parts. I would not be able to curve the body enough to go over the lifting marine - so i just used green stuff for the t the torso of the wounded guy. Some parts were already painted. 

They were all Warlord parts....paratroopers, marines and infantry.

28mm Marine
I placed the arms as high as i could and pulled them inward.


28mm Marine
The green stuff was easier to mould but i wanted the wounded guy to be holding on -almost to the belt.

I used a head without a helmet to make it seem like it had been left behind somewhere...

28mm Marine

So then I re-painted and washed, highlighted them. Then based with our clear home made base.
It reminds me of the movie Heartbreak Ridge

Finished guys looks ok on the table...bearing in mind the scale of the actual guys compared to this photo.
28mm Marine

So It looks ok and will add a bit of detail...


Tuesday, 4 June 2019

US Army extras from Wargames Illustrated freebie...

Got the free spue of US guys and painted the up to add to my other guys for Omaha...

And another 3d German printed famo, with some Germans on the back (and a quad)


28mm famo
The guy in second row is holding a map (printed)  .

The quad is on a clear base and can be removed from the Famo as and when required.
28mm famo

This is the free spue Americans for Omaha...

Medic with canteen in hand...


Medic waving for stretcher team...

28mm Omaha
Bandage in hand.


The boss...issues directions.

All foot soldiers are still to be based on clear plastic...
These guys were a great wee freebie and made up some interesting figures....

Tuesday, 30 October 2018

The making of ...the Russian Factory game 28mm ...Barrikady Gun works shed 6.

So we decided to try a Russian factory game this time.

Having won the Targe wargame show two years in a row (Best game)....the pressure is on... We need to get something for this November 2018 and this is a step by step of the build.

We needed a basic factory... we looked at Sarrisa, TT combat (Which we previously bought sheds from) and even the Commission Figures mill (which wee also bought previously). But none of these were large enough... in the end we bought a cc mini. Com 28mm ruined tank factory (model  28mm mdf 170).  This is a great starter kit (p.s. watch out for UK postage we got it from USA). It's good value and well built.

But when it arrived we thought the 2ft x 18 inch model was great but we thought let's expand it to about 5ft x 2ft. Yes... madness I know but ....we wanted it to feel right. It needed to look like the factory (Barikaddy shed 6) - and its huge.

 The original windows make it look more office than factory ...we think.
28mm Stalingrad

This is the link for the original 2ft mdf kit.
http://gcmini.mybigcommerce.com/28mm-ruined-tank-factory-28mmdf170/

Final build version video...

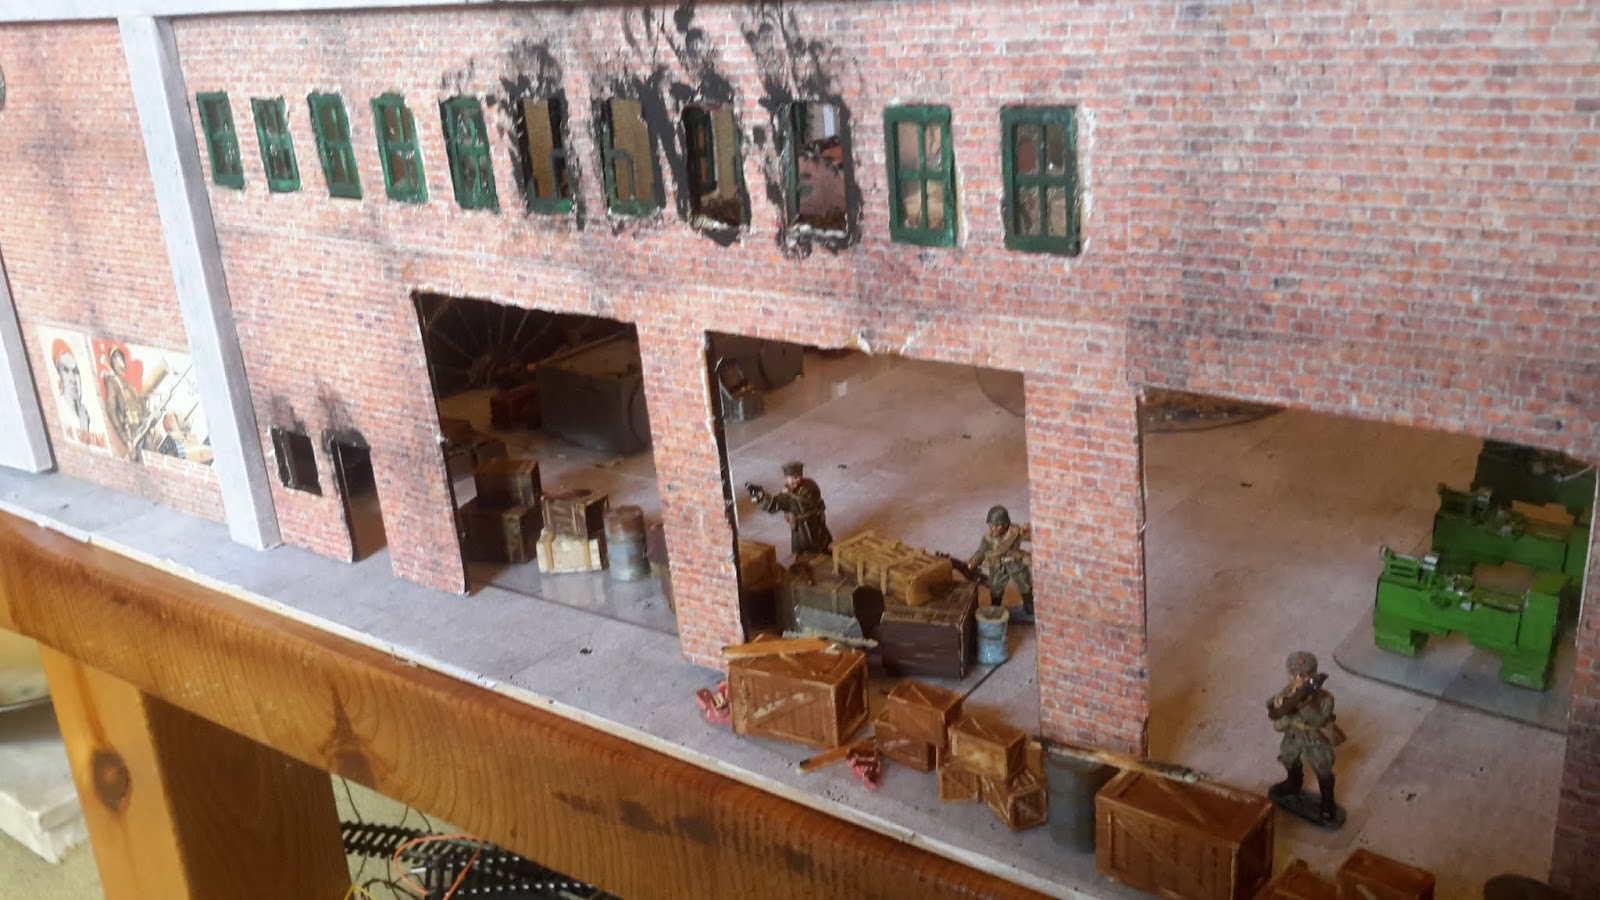
We also didn't like the shape of the windows (too much like an office). The original factory had large windows, so we cut these out and 3d printed our own to match the setting and shape. So, one window column was filled in to keep the look correct. We wanted it to look more like the original with a concrete frame around a brick build.

At this point we were also researching via a book ... Island of fire, the battle for Barrikady factory shed 6  Nov. 1942 to Feb 43.

This book  has some great photos and accounts.

So the starting kit...was small for our needs. So we now set about expanding it on all sides. We used 3mm mdf. sheets that started at 8ft by 4ft. We cut the same style windows into the plain mdf and then attached long thin wooden struts (which were covered in concrete paper) to make a concrete frame feel and to help us enlarge the sides. We did the same at the end but also raised the overall height slightly. The concrete done on the inside and outside, top and bottom. The bottom concrete supports were made thinner to emulate the sunken into the ground effect.

But we kept the original angle of the roof. The whole inside and outside was then covered in brick colour printed paper. Red brick outside white brick inside. We have seen lots of pictures which use these colours in Stalingrad. 

You can see our new windows in the picture below...the white brick paper is hiding the filled in window column. The other windows are cut out and new frames glued in.
28mm FACTORY
(Picture is of the inside - you can see the bricks we added/glued in. 
Bricks are Matchsticks cut up and painted.  We ended up making thousands of these bricks.)

At this point I should also say that the entire build needed to be flat packed to save space. Yes, a HUGE challenge...We wanted it to fit into a plastic storage box.
So we made the concrete supports  slide together. With four corner pieces that slotted into the walls (again all covered in concrete paper). A laborious task.

28mm FACTORY

We then took the remaining mdf sheet and cut it into three  2ft 3 inch wide sheets. We were going to use this as a floor (using the extra 3 inches for a pavement on each side).  This was 5ft inches long  x 2ft 3 inches wide. We cut these into 3 equal pieces.  We were going to paint this but then decided to use a concrete  effect  paper ...same as the supports. The reason being to emphasise the footprint and define the footprint on our  Deep Cut grey cobblestone mats. Like the bricks for the concrete we used a picture then multiplied it at the correct scale.

We then used double sided tape to stick down concrete paper flooring. This is tricky messy and again time consuming.  But the effect we felt justified the time.

You can see pink clothes pegs holding the concrete in place, above left. We used gorilla glue for this and all other wood and mdf bonding. Gorilla glue is great stuff we really like using it. The end wall nearest us, is still to be built...

We have no short  end wall sections at this stage...pic above (just spare bits of mdf at the ends).

We then weathered the damaged walls.
The end pieces were made from the mdf sheet but we included the original kit within the end walls. This was tricky but worked well.

 We added 3d printed vents to the outside walls . Placed in the 3d printed windows. We also added a third entrance on the end pieces to match up.
28mm FACTORY
With the scratch built end wall in place.

With four walls we then set about the pipework inside....various straws were painted weathered and then hot glued into place for piping. See picture below. You can see them at the roof edge pictured below. We used plastic comb binding for books/documents  to make pipe collars (pipe joins) for the pipes. We added spare mdf to the wall pipe areas as detail. Remember to check out the Targe Stalingrad page to see the final result and our you tube videos. So remember this entire re-build was all hand cut so all you need is a hack saw and a degree of will! Anyone can do it.

We also 3d printed some 28mm scaled gas and oxygen welding tanks, some boxes, oil drums (even spanners) and wheel barrows and placed them on the walls or machinery.

We then placed the inside machinery to ensure we had enough space. It's all mounted on clear sheet to speed up set up/ We also added a toilet block with 3d printed toilets.

28mm FACTORY

3d printed overhead crane (in green - at back) lifting an engine into T34
28mm FACTORY
Crane, Lathes and mills. 


WW2 Russian posters were added to the factory walls. See the picture above at the left hand side.

As you can see the final factory layout below its takes up some amount of space...
28mm FACTORY

 Picture above...quote "on my command unleash hell"said Maximus  ....err sorry wrong era.

Pipelines add some detail to the walls (above)


Below... we used a Sarrissa Chinese half constructed kit building as an internal "bombed office" area.
(with a little redesigning) for the factory. See front right side of the picture below.

28mm FACTORY
3d printed lathes and drill presses added on clear  plastic bases.

Now for the brick rubble... we need a lot so matchsticks have been chopped to size and now need to be painted...err keep chopping them matches.


28mm BRICKS

At the same time.... we are painting Russian casualty markers.
85 markers. 60 from black tree design and 25 off 3d printed. We have 3 packets of Warlord Russians to use so approx. 100+


So back to the bricks...
The matches were washed in red and cream paint. Then left to dry. We did various batches of these. This helped to mix up the shades.

28mm BRICKS

28mm BRICKS

It's the first time we have tried this and the effect we thought turned out really cool. I can imagine a whole mat done with these....loose bricks! We are planning to make some black ones as well.

28mm BRICKS

We also started to make the roof supports.
The roof supports are scratch built using pine strip and toffee apple sticks. Yea toffee apple sticks! These are about 8 inches apart on the top of the warehouse walls and the right side of both is complete...we are still to build the left hand side detail on the support in the picture above.

German troops are 60 Warlord blitzkrieg and a box of about 30 Warlord pioneers, with approx. 70 casualties again 40 from black tree and 30 3d printed. 2 mortars, 3 off 45mm field guns, 2AA guns, 3 flamethrowers, and some tanks.

These are still to have clear bases added.


And here are some of the painted German casualty markers....these are the Black Tree Design ones.


And then there's the Russian side.
28mm RUSSIAN


28mm RUSSIAN

28mm RUSSIAN
 All vehicles are 3d printed except one ...large resin artillery gun
28mm RUSSIAN


Below... Russian flamethrowers (3d printed Ampulant)

BACK TO THE FACTORY
And we also have an large overhead  crane the length of the factory...so I 3d printed a T34 turret and wrapped it up in chains...to suspend from the crane. It has the old red primer look to it.
28mm factory


t34 tank factory


28mm factory
The length of the inside...this is exactly what we wanted to depict a huge factory hall.

It should fit below...you can just see the crane across the runners (supports etc. still to be painted). Supports are clear bases and go up to the roof supports. The concrete floor is not used in this photo. We will build another support frame onto the crane side..so that its visually long enough. 


Above you can see the start of overhead crane effect with bombed/broken supports....see updated painted one below.


28mm factory
We are going to add wire to the broken concrete ...to represent reinforced concrete. Chimmneys are plastic pipe covered in bricks. They are held in place by a metal flat base with a bolt inserted into the pipe. This weight keeps it upright.

The overhead crane and engine. ..we've built.


Below: Toilet block for inside the main factory. (we made up 3d printed toilets).


So we then placed the fittings lathes etc. inside...you can see two T34,s inside near the middle on the right...

28mm factory
Pictured above a 28mm guy in the middle of the factory just for scale.
So that's it done - just add roof (again pictures scaled to size) of corrugated iron stuck onto card board and thousands of bricks.

Below : finished look.of the outside wall at a game show

Below: a long shot from the top end showing inside.

More updates soon, remember to come and chat if you are at Targe war-game show...


see also our Targe show page with the final result... and our Stalingrad Game  Report