I managed to get a box of Warlords 28mm Japanese Imperial Army for Christmas (we already have 2 other boxes and the Japanese Marine Box). But these were built by another Warhog so I thought these would be something different for me.
I had seen a painting video on u tube and my idea was to also to test out the Citadel paint washes. These washes are applied over a dull white base. So we wanted to see what the difference was between the washes and the Vallejo / model colour Japanese uniform(which is our usual colour).
I have to say I found the washes for the uniform, helmet and faces great but I personally prefer the webbing straps in paint rather than a wash. You also need to be careful when touching in your paintwork....if you "over wash" an area it needs to go back to the white base coat and start again. But they did provide a nice finish.
Also as you will see from our previous posts we hate wasting any parts (see the "wading Marines" in our earlier posts).and after viewing John Bonds wargaming blog - the post on his blog (27 Nov last year ) - I really liked the idea of some Japanese in trenches for our Pacific game. John has some excellent examples...have a peek.
So to use up the spare Japanese parts I did these at the same time as experimenting with the colour washes...
The Japanese colour washed infantry were placed on our punched out clear acetate bases.
We really like the clear bases but sometimes the flash makes them look more "glossy". We have in the past experimented with matt varnishes (brush and spray) but they all tend to cloud the finish - so we now just leave them untouched.

I pulled out our mats to get some photos and to ensure they blended..
The Japanese (in trenches/spider holes) were made from the spare parts and green stuff (Kneedite).
"Washed" painted Japanese...
In John's Blog he cuts the actual figures and I have cut guys in the past for wading etc. but this was just about using up the spares I have ...
So I managed to get about 21 extra guys out of the Warlord box. That's a fair amount of extra guys for nearly nothing.
.
They blend in nicely with the Deep Cut mat.
The LVT1 below is about to be overrun!
Even if you only use them as dug-in "markers" then use full size for further movement - it adds to the game.
It was definitely worth the time...you get more guys for your table top and you don't waste any parts...(unless of course you want the detail of the actual body).
All of the Japanese in this post were painted with the washes.
See our previous posts for Model Colour Japanese Uniform.
As I said earlier - i especially like the washes on the uniform. Overall it gives a lighter appearance to the figures.
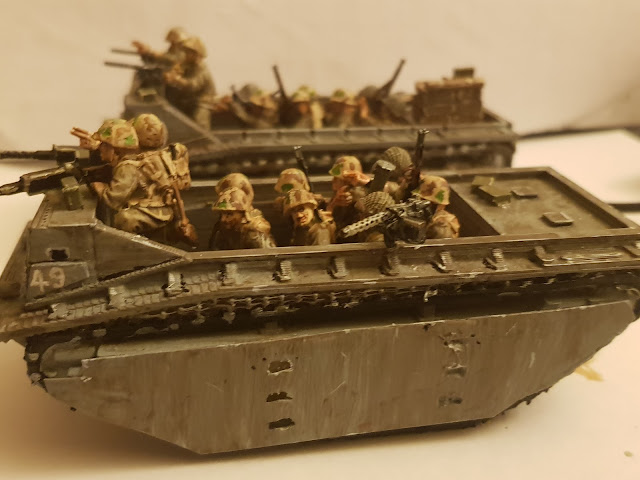
Also I was able to design a small troop insert for the 3d printed LVT1.
The challenge here was to get as many troops in the LVT1 as possible
(the actual LVT could carry 18 troops - they would have been packed in!).
After looking at the Warlord Marines I decided these were unsuitable due to the wide stances and poses.
They would take up too much space. I needed them standing upright with their feet close together.
So I took a 3d figure into the 3d software and halved it in two. Then using the legs I scaled it to 28mm. Multiplied it (x8) times. Then because I wanted to be able to remove them - I had to leave clearances around all of the sides (for an access gap). So that i could lift them out the LVT.
I also added a 2mm fixed base across all of them to save me gluing the figures on. The figures were rotated slightly (at the design stage) to ensure they all appeared slightly different. But all were "standing" to ensure the maximum number were as close together as possible.
The access gap greatly reduced the space available inside.
I placed some green stuff on some of the thinner areas.
I then broke into the spares box for heads, packs, arms and weapons.
The upper body was green stuff and attached straight onto the 3d print.
They were painted up . I was also aware that only the top would be visible when in use.
So I managed to get 8 guys into the space easily.
This is my "representation" of the filled LVT vehicle for gaming.
The effect turned out ok and the insert can be replaced with a full set of standing figures when outside the LVT.
I might add some more green stuff on the top of the backpacks for the camouflaged marine ponchos.
Ready to rumble...So I then went into production mode and I've just finished the 7th troop insert.
I did one with ammo boxes at the front for some variation.
These should fill out the LVTs nicely. I ended up with an extra 52 guys.
This "Chow" line keeps getting bigger LOL

So that seemed to work out...now to get them on the table.


